

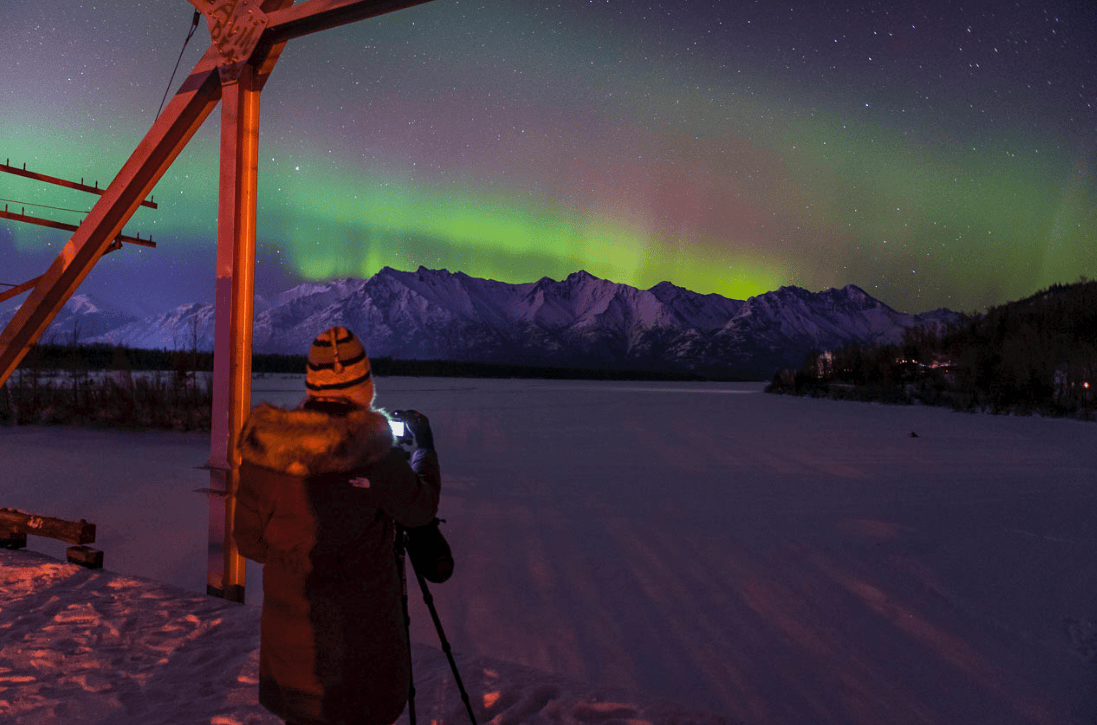
Northern Lights images is just not like different night time images; it has challenges that go method past regular night time images challenges – particularly…the chilly! You solely get Northern Lights within the winter when you have got these attractive darkish skies. As well as, the aurora oval revolves across the geomagnetic north pole, putting you in among the coldest environments on Earth. All of this implies you’ll be ready out within the chilly for the right {photograph} of the northern lights.
In case your dream is to {photograph} the northern lights, then you definitely’ll have to be in the suitable place, have the suitable digicam gear, and be ready together with your digicam settings. And also you’ll wish to be sure that you keep heat when you are working in your good {photograph}.
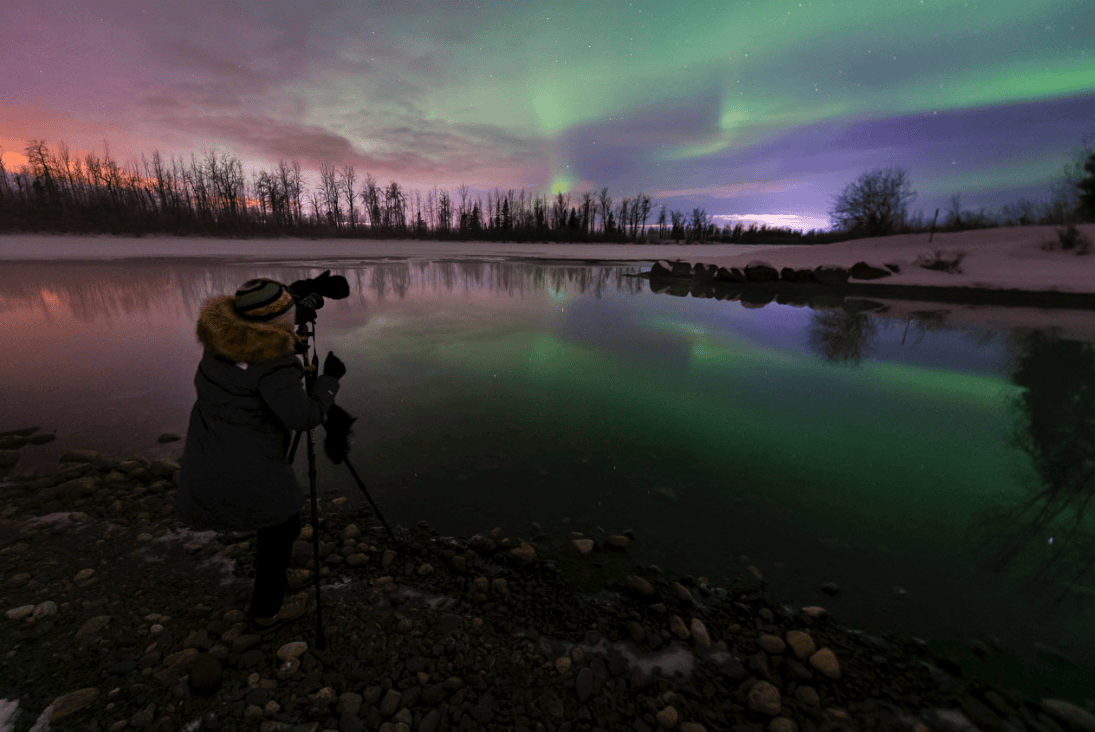
I’ve spent numerous time photographing the northern lights in Alaska. I’ve even been fortunate sufficient to see the southern lights on a cruise to Antarctica! From these experiences I’ve accrued an in depth listing of ideas for making certain your aurora images seems nice, you keep heat, and have enjoyable. I’m excited to share the following tips for capturing the Northern lights whereas staying cozy.
What are the Northern Lights?
I’m no scientist – however I can inform you aurora borealis is a recipe made up of the solar, photo voltaic bursts, photo voltaic wind, the earth’s magnetic fields, and our ambiance. If you would like an in-depth clarification, take a look at this Northern Lights Outlined article.
Indigenous Explanations of the Northern Lights
Along with the scientific clarification, there are additionally Indigenous explanations too. The Alaskan Native folks and Inuit consider that the Northern Lights are the spirits of their ancestors searching within the night time sky, and that’s why they’re energetic and shifting.
One other model is the spirits of the ancestors watching over their family members on earth. The spirits are so pleasant, it’s stated you’ll be able to invite them for a ‘dance’. If you dance, they are going to be part of you dancing and you’ll primarily ‘dance them out’.
Once I was advised this, I puzzled if the Hokie Pokie dance would work – it’s the one dance I do know! Not less than for those who select to ‘dance them out’, it’s additionally an effective way to remain heat concurrently!
The place to Discover the Northern Lights
You discover the northern lights beneath the aurora oval. The oval thickness modifications periodically, however typically, you’ll discover the aurora oval across the Earth’s geomagnetic poles. You’ll additionally want clear skies with a view to see the northern lights. Which means among the finest odds of seeing them are locations with clear skies.
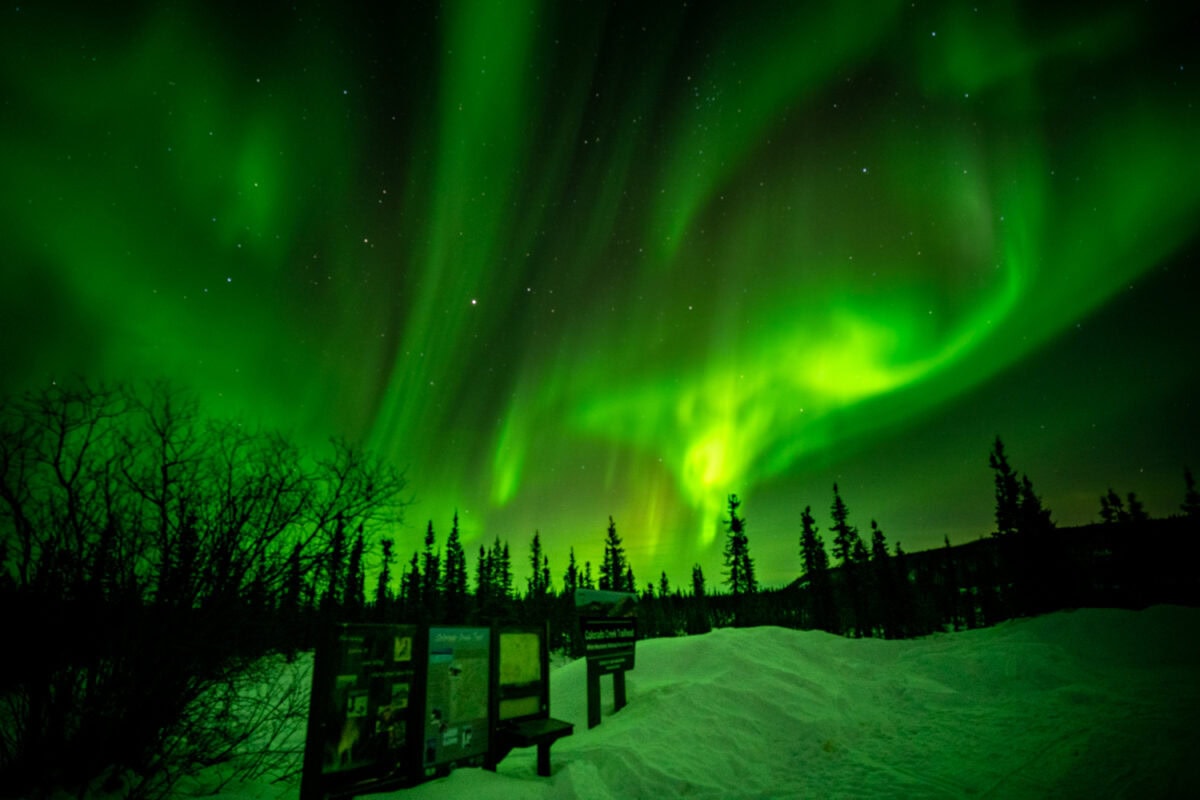
My favourite place to {photograph} the aurora borealis is Fairbanks, Alaska. It’s within the Alaskan inside, which suggests extra clear skies and a higher likelihood of seeing them. Plus, there are many nice issues to do in Fairbanks (canine sledding and snowmobiling, along with chasing Aurora!
Another nice locations are:
- Yellowknife, Canada (Yukon)
- Churchill, Canada (Manitoba)
- Northern Norway
- Iceland
- Northern Finland
- Greenland
- Northern Sweden
In fact, you might be able to {photograph} them in Minnesota or Montana – nevertheless, the percentages are a lot decrease. I want to go to locations beneath the aurora oval, the place I’ve a positive aurora forecast more often than not and good odds of clear skies for the most effective images. That’s Alaska for me.
Digicam Gear You’ll Want for Photographing the Northern Lights
There are just a few additional issues that you just’ll want for night time images, and particularly northern lights footage, which might be completely different from a typical images gear listing.
Tripod
I by no means usually journey with a tripod, however within the case of night time images, it’s a should. You’ll need a good, sturdy one that may cope with wind. Plus – make it possible for it isn’t metallic. Metallic tripods can get extremely chilly, and also you don’t wish to contact freezing-cold metallic, even with gloves. I take advantage of the Peak Design Journey Tripod, which is extremely small however sturdy and quick to get into place!
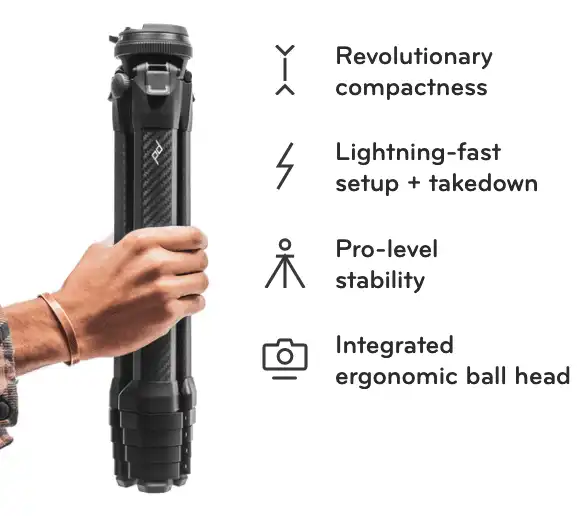
Peak Design Journey Tripod
That is the smallest and sturdiest journey tripod I’ve discovered available on the market. That is an aluminum model (3.4 lbs) – however additionally they have carbon fiber (2.8 lbs). A journey tripod that packs all the way down to the diameter of a water bottle—with out compromising peak, stability, or options. Plus, it is really easy and quick to setup and take down!
I earn a fee for those who click on this hyperlink and make a purchase order, at no further price to you.
Vast Angle Quick Lens
Any lens will work, however the wider the lens, the higher. Northern Lights can take up an enormous space of sky, and also you wish to seize as a lot of the present as potential along with the foreground. In reality, if you’re doing northern mild images beneath the Aurora oval, the Aurora will usually present up arcing throughout the sky like a rainbow. To seize that whole shot, you have to a wide-angle lens.
When in Fairbanks, Alaska, photographing the aurora borealis, I shot with a 10mm or 18 mm more often than not. Usually, a focal size of 14 to 30mm is what you must purpose for. Fairbanks is generally instantly beneath the aurora oval, so it’s good to have the ability to get an enormous huge view of how excessive within the sky the lights climb. Nonetheless, a 24 mm additionally works, however you’ll seemingly not get the total arc of the northern lights. Simply bear in mind {that a} 10mm lens tends to distort issues within the foreground.
As well as, the sooner (lowest F cease quantity, corresponding to f1.8 or f2.8) lens you should use, the higher. This lets you work with extra mild – one thing that’s in brief provide throughout night time images. With no quick lens, exposures will have to be longer, and that may are likely to blur the aurora extra. My quickest, widest lens solely went to f4, and I might nonetheless shoot at shutters of 10 seconds with out an excessive amount of of an issue. Use what you have got, in fact – as a result of something is healthier than nothing!
Uncover the finest digicam bag for journey – organized by journey fashion
Hire a Lens for Aurora Pictures
Should you don’t have a large angle, quick lens, don’t worry – you don’t have to exit and spend 1000’s of {dollars} on a lens only for northern lights images. As an alternative, you’ll be able to lease an amazing lens for Aurora images.
I’ve rented from each Borrow Lenses prior to now. I rented the Zeiss Batis 18mm f/2 for Sony E-mount for ten days costing aproximately $120. This contains delivery. I didn’t get the insurance coverage although as I’ve different journey insurance coverage that may cowl it. Aspect notice – I at all times really feel just like the insurance coverage is a sham on this stuff. Earlier than buying the insurance coverage out of worry, first test to see if any of your different insurance coverage (dwelling, journey, bank card) will cowl the lens.
This was an amazing lens with high-quality glass for capturing the northern lights. You may clearly get one thing even higher, just like the Sigma 14mm f/1.8 Artwork E Mount. That’s the wonderful thing about Borrow Lenses – you’ll be able to check out a lens before you purchase it.
Digicam
I take advantage of a Sony A7iii mirrorless digicam. Not too way back I switched to mirrorless from my Canon DSLR system. The primary factor to search for in a digicam used to {photograph} the northern lights is low-light efficiency (increased ISO). ISO vary of 100-51200 is good. As well as, battery life and climate sealing are additionally vital, which is crucial for the lengthy and chilly nights beneath the Northern Lights.
A guide mode digicam is required for Northern Lights images. You have to have the ability to management f-stop, shutter speeds, and ISO, every manually – extra on the settings for northern lights beneath. Full-frame cameras may even produce a better-quality picture.
Pink Mild Head Lamp
Not solely will you want some kind of mild to mild up the digicam controls and regulate your digicam, however you’ll additionally need a highly effective mild that can assist you mild up the foreground, test your focus, and make your Northern Lights images much more picturesque.
It takes about 20-Half-hour on your eyes to totally adapt when doing images at night time. A crimson mild is non-glaring, so it could actually assist you see higher at night time. Activate a white mild and break your darkish adaptation and that of everybody round you. Due to that, white flashlights and cellphone lights are discouraged when viewing northern lights.
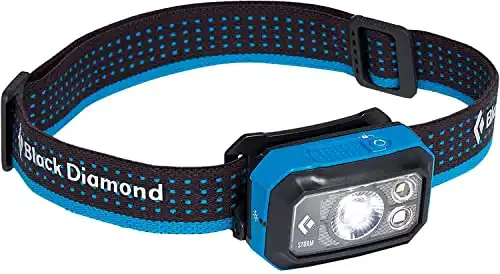
Black Diamond Storm 400 Headlamp, Azul
The Storm 400 additionally has three completely different coloured night time imaginative and prescient modes and peripheral white lighting for close-range actions like rigorously re-racking for the ultimate summit pitch at nighttime. The headlamp has our Brightness Reminiscence characteristic, which lets you flip the sunshine on and off at a selected brightness with out reverting again to the default, full energy setting.
Distant Shutter Launch
This isn’t required, however many individuals use distant shutter releases for night time images to cut back any chance of digicam shake whenever you bodily hit the shutter button. Some distant releases have further choices like an intervalometer, lightning set off, and distant management of digicam settings.
Further Batteries
In chilly climate, battery life goes quick. Be sure you at all times have additional batteries when you’re chasing the northern lights. Take greater than you suppose you’ll want! In Fairbanks, I used to be typically capturing in -10 to -20, and our digicam battery life was minimal.
My rule is to convey double the batteries than what you suppose it’s possible you’ll want. I had 5 with me and there have been nights the place I virtually went via all of them.
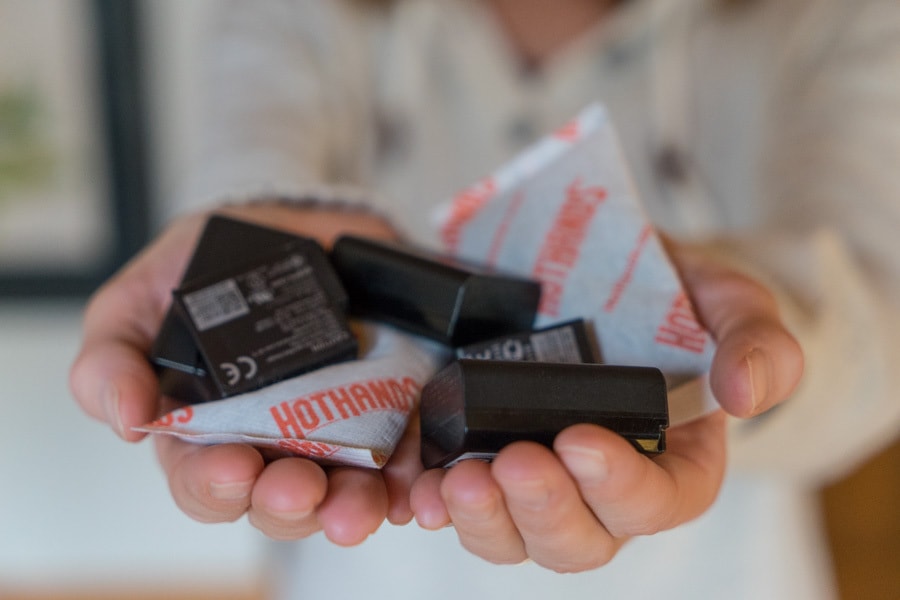
Hand Heaters
Sure – these are nice to must preserve your palms heat – however much more importantly they’re nice to maintain your additional digicam batteries heat. The chilly will sap your batteries even when they aren’t in your digicam – so hand heaters are actually useful whenever you {photograph} the northern lights. I’ve used a budget little disposable hand heaters, however I actually love the brand new electrical ones that may be merely recharged with USB and used time and again.
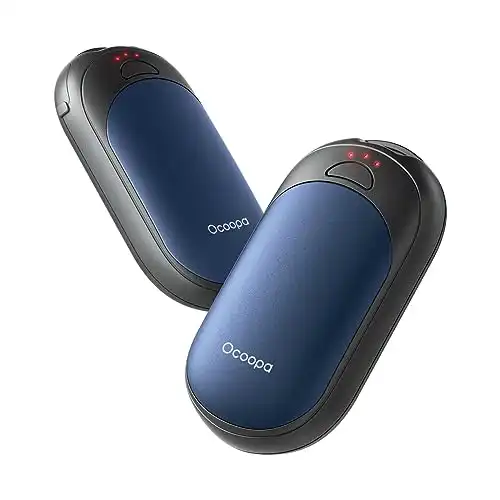
Magnetic Rechargeable Hand Heaters
Electrical Pocket-Sized Handwarmers with 3 warmth settings will preserve your palms toasty heat within the chilly temps. These are ultra mild and skinny and can simply slot in your pockets. As well as they warmth up actually quick, and can final for aproximately 4 to eight hrs.
Northern Lights Pictures Suggestions
You’ve received all of your gear, however the following tips are important for the distinctive atmosphere your digicam gear will face when out within the freezing chilly!
As soon as Your Digicam is Outdoors, Go away It Outdoors
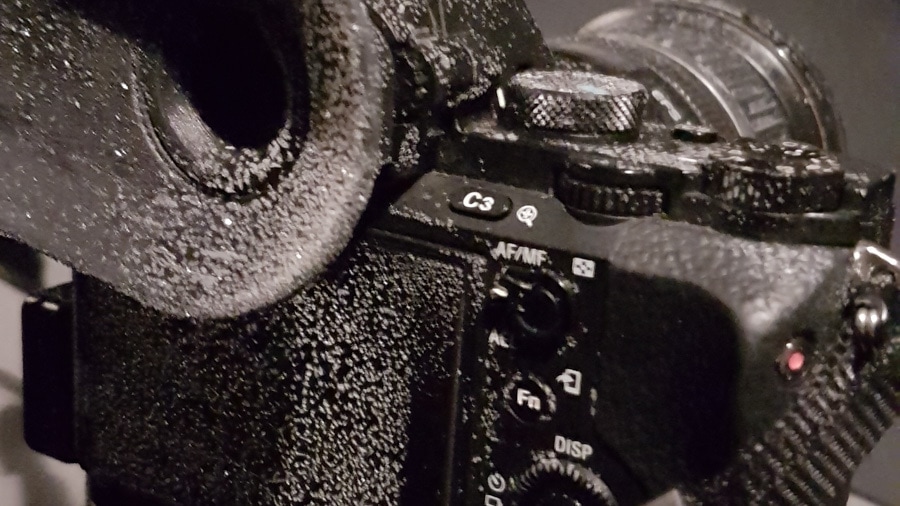
That is the very first thing to know and observe religiously. Your physique can go out and in of the chilly with little dire affect moreover being uncomfortable; nevertheless, your digicam can not. Don’t topic it to the large temperature swings inside and outside, because it results in condensation inside your digicam, to not point out it’s simply rattling powerful on the digicam typically.
Set your digicam up on the tripod, situate it exterior within the space the place you wish to shoot, after which go away it there till you’re accomplished capturing utterly for the night time. You’ll must acclimate whenever you come again exterior, however your digicam received’t, and that may guarantee you may get the Northern Lights images you’re hoping for.
Professional Tip: “Should you should take your digicam inside from the chilly, place it again in your digicam bag or backpack earlier than you return onto the nice and cozy space. Preserve it within the closed bag, which is crammed with the identical chilly air that surrounds your digicam exterior, till you return exterior. It will forestall condensation. Should you keep inside for a protracted time frame, finally, it’s going to heat up progressively, and all the pieces will probably be superb. Should you do expertise condensation, your solely treatment is to maintain the digicam in a comparatively heat, dry room till it utterly dries out. Solely then can you’re taking it exterior once more.” – Dan Bailey, Alaska Photographer
Take Your Batteries Out of Your Digicam
However wait! Earlier than you simply go away your digicam sitting exterior on the tripod, take the batteries out of it and take them inside with you. Should you go away them within the digicam exterior – they are going to most undoubtedly drain and be of no use to you.
Batteries Can Come Again to Life
Usually, chilly batteries are only a huge tease. They inform you they’re empty, however actually they aren’t. Simply heat them up once more in an inside pocket near your physique. Or higher but, put them in a pocket with hand heaters to get them good and toasty once more. Abruptly, you’ll discover that they arrive again to life. If you put them again in your digicam, it’s going to present that they aren’t empty. See…an enormous battery tease.
Chasing Fall – The place to Discover Autumn Coloration in Alaska
Level the Lens Downward
Maintain on! I do know I do know, you have got left your digicam sitting on the tripod with the batteries taken out and saved safely in your heat pocket – nice. However there may be yet another key factor to do earlier than you go have that sizzling toddy inside. Alter your tripod head and level the lens down in the direction of the bottom. It will make sure the glass on the lens doesn’t get frosted over.
I discovered this superior tip from Frank on the Aurora Bear Pictures Workshop. On the coldest night time we have been capturing (round -15F), I left my digicam pointing down towards the snow on my tripod as I waited in a yurt, making an attempt to heat up. Once I returned to search for Aurora periodically, I seen my entire digicam was frosted over! Nonetheless, the lens pointing on the floor was not. This fashion, when the aurora got here out immediately, I used to be prepared! I simply popped the battery again in, readjusted the tripod head, and received my pictures despite the fact that my digicam was utterly frosty!
Take away Your Filters
Frank at Aurora Bear additionally taught me to take away the filters on my lenses as they’ll produce a collection of darkish concentric circles within the heart of your photograph. Plus, some filters may even scale back your accessible mild. You might be already challenged with low mild circumstances when capturing the Northern Lights; don’t make it worse!
Professional tip: “Additionally, watch naked noses on ice-cold metallic and plastic digicam our bodies. If it’s chilly sufficient, you’ll be able to simply frost-nip the top of your nostril whenever you press your resist the digicam to take pictures. I do know as a result of I’ve accomplished it. Both attempt to maintain your face barely away from the again of the digicam or else use some form of nostril defend or face masks. Your pores and skin will thanks.” Alaska photographer Dan Bailey
Shield Your Gear from the Subzero Temperature
At -15F, you don’t need any naked pores and skin to the touch the metallic lens – the lens is method too chilly to deal with. I take advantage of LensCoat LensCovers for my lenses. LensCovers are product of Neoprene, And match snuggly across the lens. They defend lenses from bumps and scratches, in addition to make them simpler to carry on to when it’s freezing exterior! This made them good for northern lights images.
You may as well get tripod leg covers that are really helpful for chilly climate; nobody needs to seize onto a below-freezing tripod leg!

LensCoat LensCovers
LensCoat® lens covers provides your priceless gear some safety from scrapes and bumps, preserving its resale worth. It additionally assist break up the form of your lens, making it much less noticeable to wildlife.
I earn a fee for those who click on this hyperlink and make a purchase order, at no further price to you.
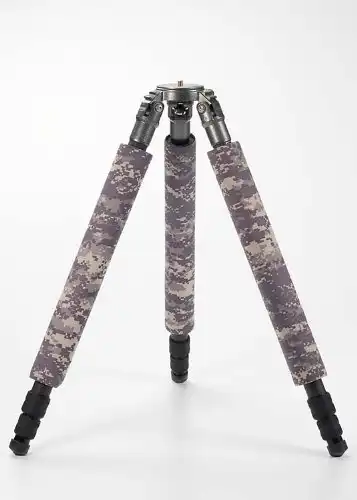
LensCoat LegCoat Tripod Leg Covers
LegCoat® Wraps are constructed from gentle neoprene are designed to wrap across the higher leg of your tripod and are simply affixed with a Velcro closure. The Wraps backing is designed to tightly grip to your tripod legs so they won’t slide. The covers act as a thermal barrier making the tripod extra comfy to deal with in sizzling or chilly circumstances.
I earn a fee for those who click on this hyperlink and make a purchase order, at no further price to you.
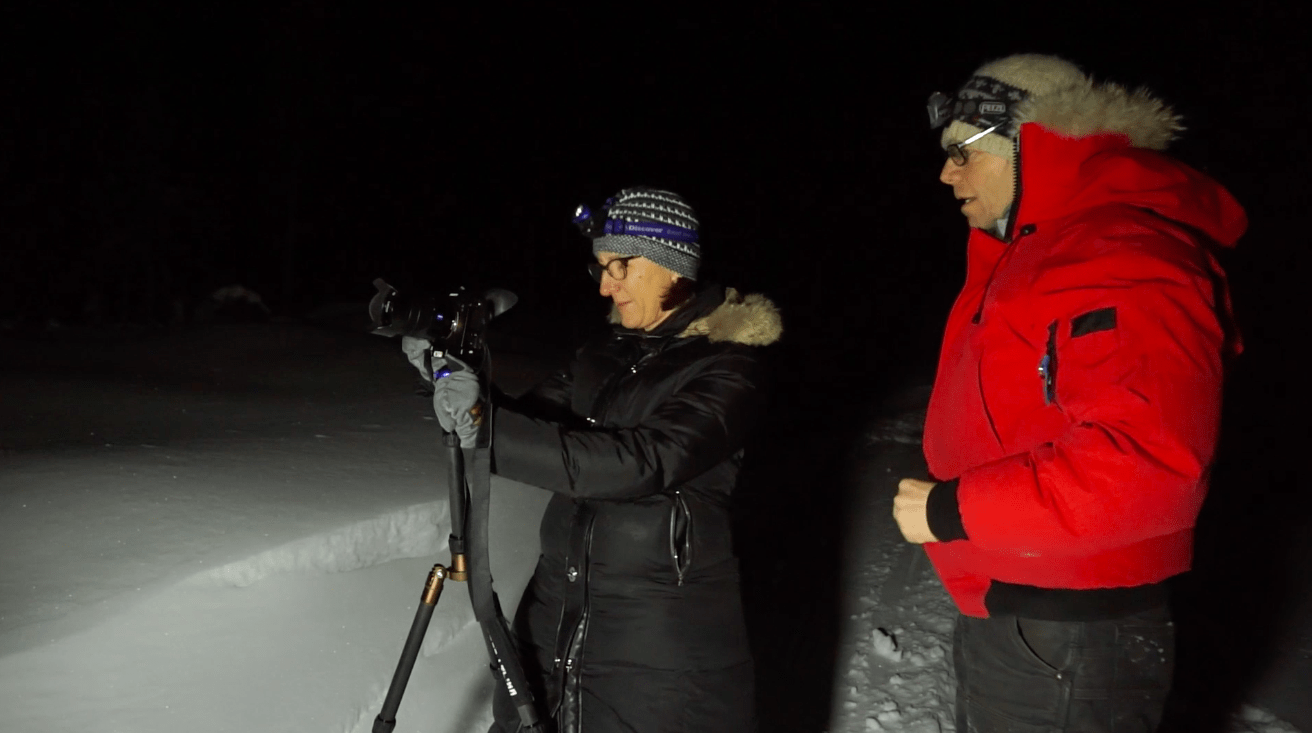
Learn how to Keep Heat Whereas Photographing Northern Lights
You must be ready for chilly climate images, or else you’ll be depressing, AND it’s possible you’ll lose your alternative to get pictures of this spectacular occasion.
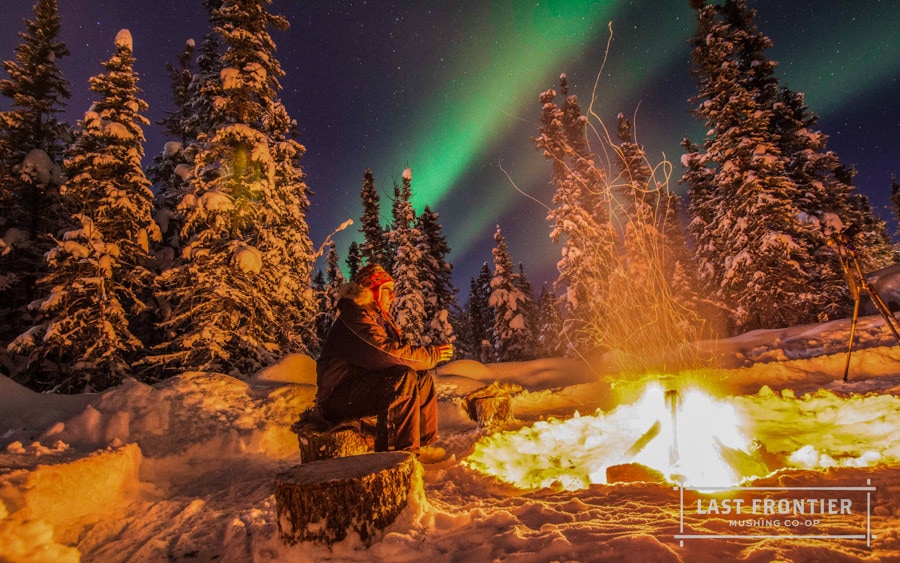
One of many coldest actions to do within the winter is photographing the aurora. That is primarily since you spend numerous time standing and sitting nonetheless waiting- which is the recipe for getting chilly actually quick. I do numerous snowshoeing and snowmobiling as out of doors winter actions, and I seldom get chilly as a result of my physique produces warmth and makes use of vitality. Subsequently, listed below are the gadgets I like to recommend for staying heat whereas ready for the Northern Lights to look!
Heat Pictures Mittens
For me, one of the crucial difficult issues about northern lights images is preserving my palms heat whereas altering digicam settings. There’s typically numerous trial and error concerned in capturing the northern lights; you’re at all times fidgeting with the buttons and settings. And which means chilly fingers. I take advantage of the Warmth Firm Gloves for chilly climate images. I like them as a result of you’ll be able to simply fold again the highest of the mitten to get to the digicam buttons after which rapidly fold the highest of the mitten again in your fingers to reduce warmth loss.
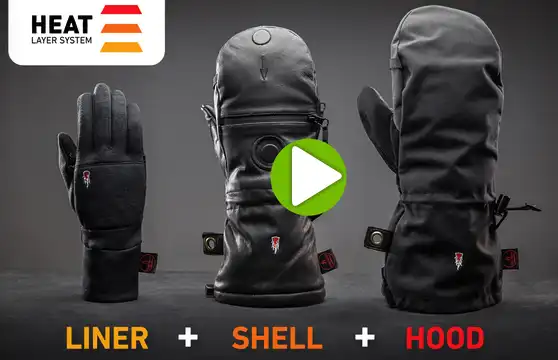
Workforce these images gloves up with the electrical hand heaters I mentioned above, and also you’ll keep heat!
I can even advocate heated gloves too. In reality, top-of-the-line available on the market is the Gordini Heated Gloves. They’re fairly good gloves – they’ll thermoregulate themselves! You may set the temperature you need them to keep up through a cellphone app!
Chilly Climate Jacket
A heavy parka is really helpful for aurora images. Or you’ll be able to layer a wind jacket with a puffy jacket. I want longer coats, although, like parkas for being out in the course of the night time. You may as well attempt a heated underlayer. Heated merchandise have actually come a good distance prior to now few years. They’re much extra reasonably priced and the warmth performance is at all times bettering every year.
The North Face Ladies’s Down Parka
The North FaceWomen’s Bounce Down Parka offers winter safety from the highest of your head to your knees. This cold-weather coat options waterproof DryVent cloth and 550-fill down insulation. Not as soon as was I chilly in Alaska on this parka!
I earn a fee for those who click on this hyperlink and make a purchase order, at no further price to you.
08/02/2024 02:33 pm GMT
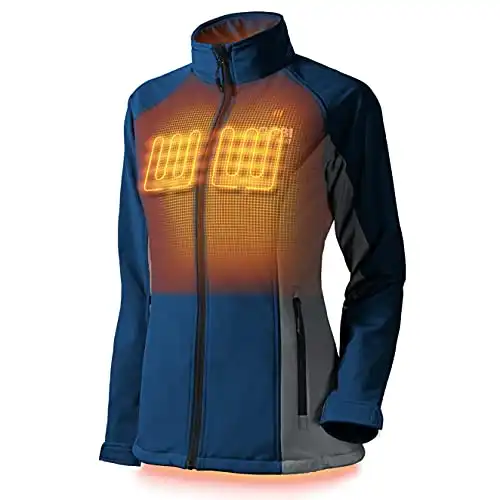
Sahara Ladies’s Heated Jacket
Nice for a layer beneath your favourite winter coat.
From Gobi Warmth – 10 hrs of Warmth | 3 Warmth Zones | with Battery & Charger | Machine Washable | All Day Heat
I earn a fee for those who click on this hyperlink and make a purchase order, at no further price to you.
04/09/2024 10:47 pm GMT
Socks and Boots
Standing out on the snow for lengthy durations of time doing images means inevitably chilly toes. You should utilize the disposable toe heaters – nevertheless I’ve discovered that the electrical socks are actually nice options too! Granted – they’re extra of an funding – however they’re nice for any chilly climate exercise like snowboarding or snowshoeing. I used the Gobi heated socks on my final journey and was actually pleased with them.
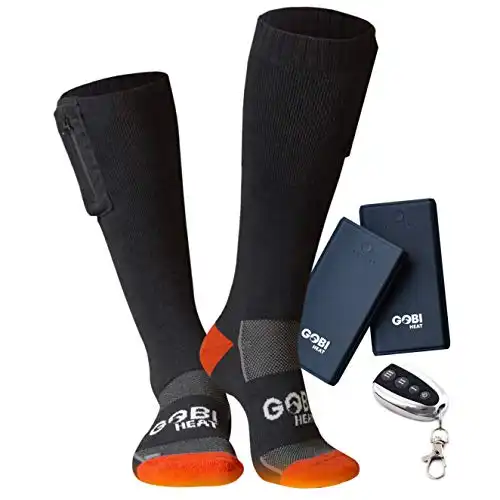
Gobi Warmth – Heated Socks
Out of all the heated merchandise on the market – I discover the socks work the most effective.
They use a metal fiber heating know-how and twin slim 2,400 mAh Lithium Polymer batteries enable for prolonged warmth throughout longer day journeys. They heat up inside 30 seconds so really feel extra comfy instantly!
12 hours of Warmth | Battery and Charger Included
I earn a fee for those who click on this hyperlink and make a purchase order, at no further price to you.
08/02/2024 01:02 pm GMT
Favourite

Oboz Bridger 7″ Insulated B-Dry Climbing Boot
Sooo – comfy and heat! These are my go-to winter insultated boot. I take advantage of them for snowshoeing and on a regular basis round city stuff when it is actually chilly. O Match Thermal insoles present stability and help whereas lowering warmth loss to maintain your toes pleased!
I earn a fee for those who click on this hyperlink and make a purchase order, at no further price to you.
Different Gear to Keep Heat Chasing Aurora
Ottsworld Favourite Model
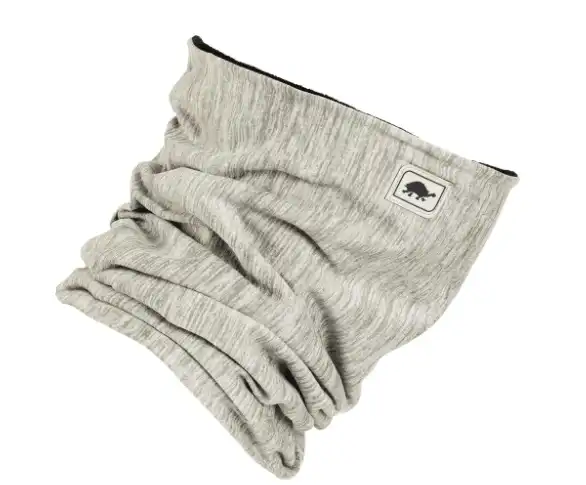
Turtlefur Winter Neck Hotter
The Pipe Dream™ is a heavyweight neck hotter totally lined with tremendous gentle micro fleece to lure warmth and keep put, all whereas preserving you cozy and comfy
I earn a fee for those who click on this hyperlink and make a purchase order, at no further price to you.
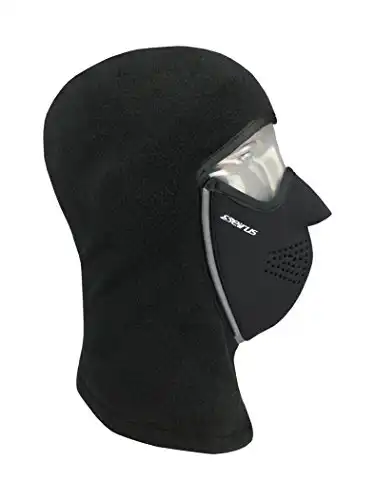
Seirus Magnemask Combo Clava
OMG – I really like this for actually chilly climate! The masks is secured by a magnet and it is easy to drag down and flip again up. Breathable and heat!
I earn a fee for those who click on this hyperlink and make a purchase order, at no further price to you.
08/02/2024 01:49 pm GMT
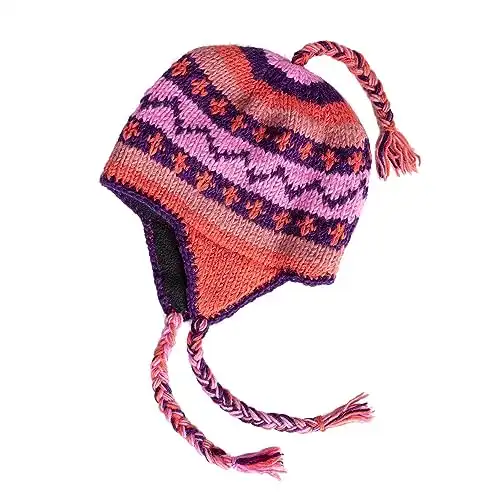
Hand Knit Sherpa Hat with Micro Fleece Lining
- 100% Wool Hand Wash Solely
- 100 % New Zealand Wool Fleece Lining. (Itch free)
- ❤ Truthful Commerce and handmade in Nepal. Hand knit one by one, not mass produced so there could also be minor variations in shade and imperfections.
I earn a fee for those who click on this hyperlink and make a purchase order, at no further price to you.
08/02/2024 01:03 pm GMT
See my full listing of drugs for excessive climate right here
Enhance the Total Expertise of Your Northern Lights Pictures Outing
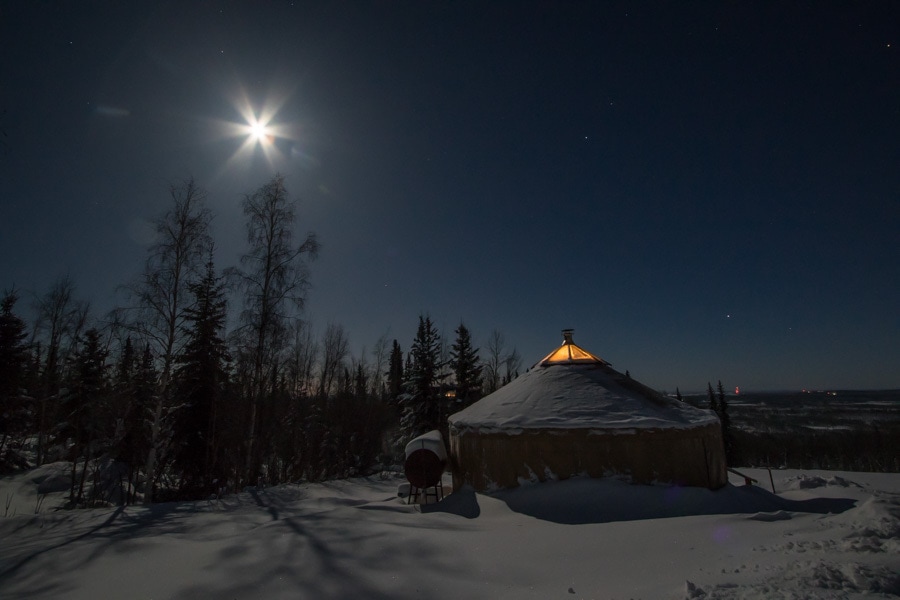
Have a Place to Wait Inside
The Northern Lights are unpredictable, and heat is crucial in Fairbanks as you wait. If you are able to do a Northern Lights journey that has an indoor choice the place you’ll be able to wait inside – that is a lot most popular. And if it has food and drinks…even higher! If you’re merely ready in a automotive – simply be sure you have sufficient gasoline and preserve the automotive operating and the warmth on!
Deliver Some Scorching Drinks
There’s nothing higher than a piping sizzling mug of sizzling chocolate whilst you anticipate the aurora forecast to enhance! Many Northern Lights excursions could have issues like sizzling chocolate, tea, espresso, and instantaneous ramen to maintain your insides heat. Or for those who go by yourself, remember to convey a thermos of sizzling drinks.
Embrace a Full Moon
Opposite to common opinion, the total moon can mild up your northern lights scene completely.
It’s vital to notice a full moon doesn’t obscure the sunshine of the aurora, in reality, the intense moon typically enhances the distinction between the surroundings, snow, and the aurora offering a pleasant pure mild within the foreground.
Know Your Instructions
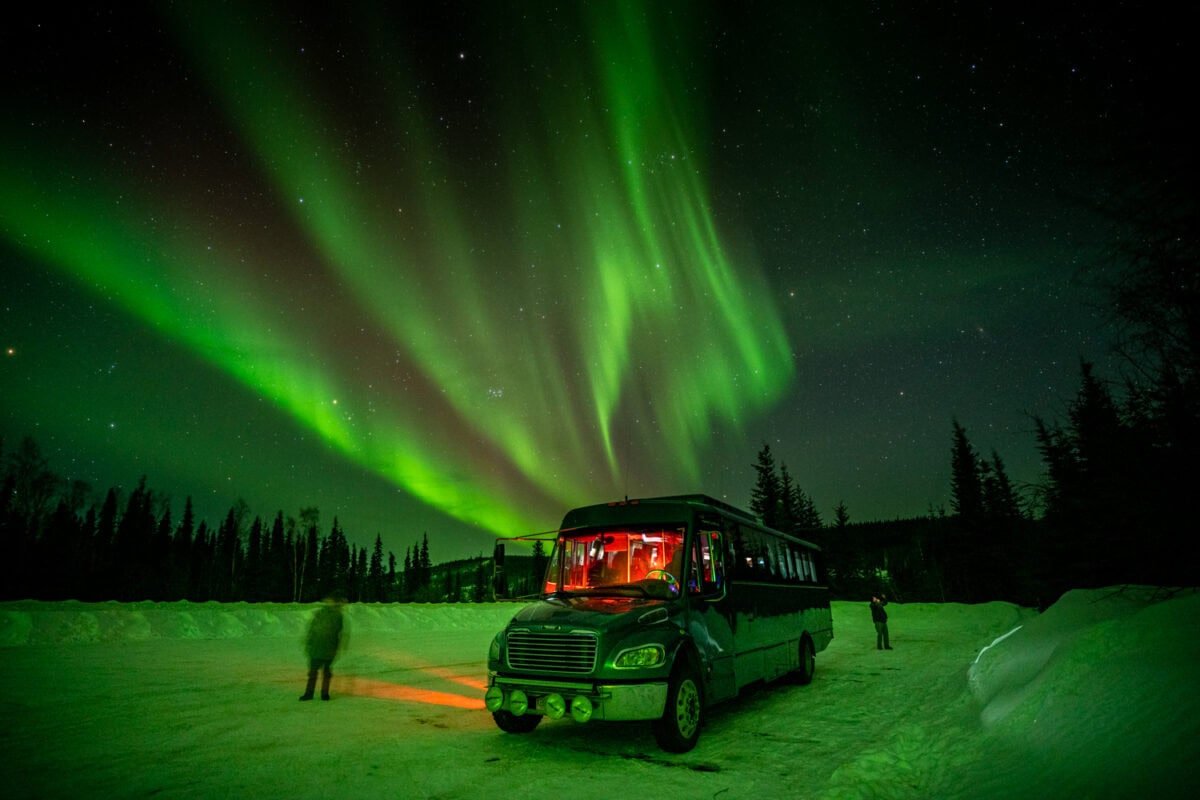
After speaking with physicist Peter Delemere on the Geophysical Institute in Fairbanks, we discovered when you’re armed with a bit data, you’ll be able to have a greater expertise. Peter steered understanding your instructions (N/S/E/W) and understanding the place the aurora oval is so you’re looking in the suitable route. In Fairbanks, the aurora oval usually sits simply to the north. So whenever you get to your capturing location, arrange your gear pointing north and watch the northern horizon for the primary indicators of the aurora.
Take an Aurora Picture Workshop
In fact, the quickest and easiest method to enhance your Northern Lights images is to take a workshop the primary night time you exit! We went to Aurora Bear Pictures Workshop and had a one-on-one expertise with Frank Stelges, who set us up for our future nights of aurora chasing!
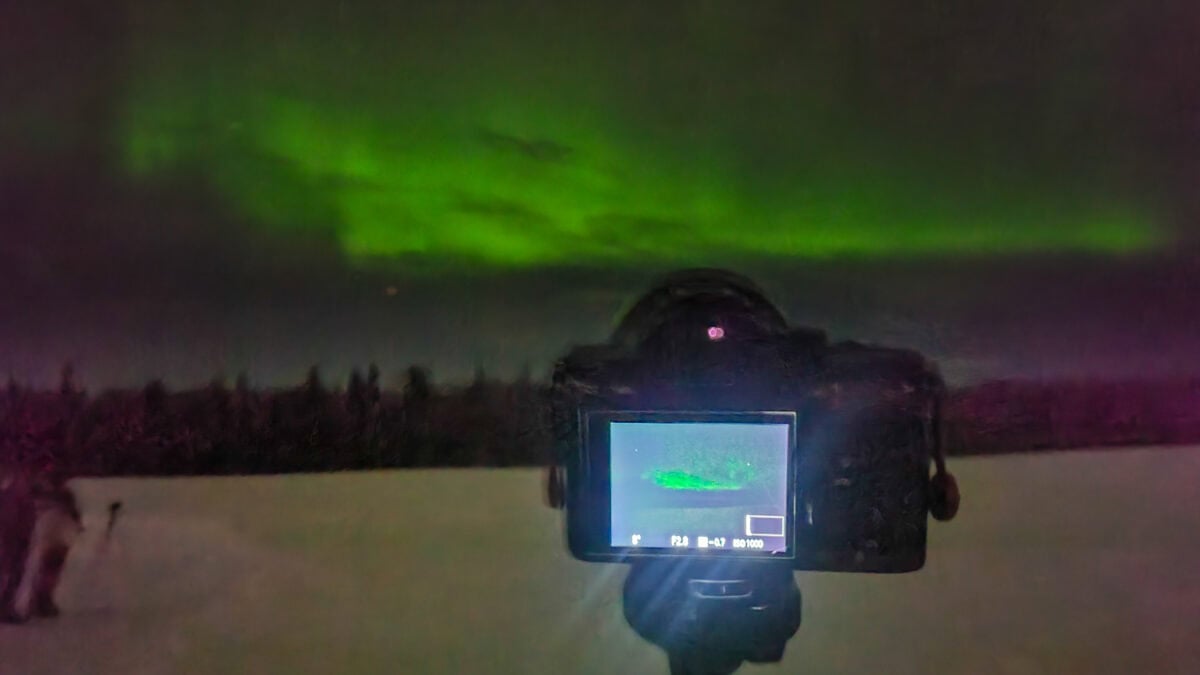
Finest Digicam Settings for Northern Lights Pictures
I’ve a bit guidelines I carry on my Evernote cellphone app so I can at all times check with it. All it’s a must to do is be sure you have all digicam gear I discussed above, and simply observe these steps to nice aurora images!
1. Activate Guide Mode
That’s proper…Northern Lights images means it’s essential to get out of auto. No auto exposures, no autofocus, no auto ISO. That is the place the rubber hits the highway in images and you’ll have to perceive guide settings.
If you’re at the moment questioning what guide settings are, then I recommend you’re taking a category BEFORE your Northern Lights journey so you know the way to make use of your digicam’s guide settings, methods to regulate them, and why.
2. Activate Guide Focus
Sadly, your digicam, irrespective of how fancy it’s, can not auto-focus at nighttime. It’s guide all the way in which, child!
3. Set Focus to Infinity
Should you don’t have an infinity setting, then you definitely’ll wish to probably take your digicam out within the daylight and focus it on probably the most distant object you’ll be able to see and make a mark in your digicam as to what that focus spot is. Or go away it on the market and don’t contact it. However truthfully, most DSLRs and lenses have infinite settings nowadays. They aren’t all good, although, so it nonetheless could also be a bit trial and error.
4. Flip Off Auto ISO
Begin with a setting round 1600 and regulate from there. Don’t be discouraged if it’s a must to change it rather a lot earlier than you’re pleased with it.
5. Activate Your Digicam Timer
Should you don’t have a distant shutter launch, then activate the timer. I usually have a 10-second timer set for night time sky images. This fashion, you’ll be able to press the shutter and watch the countdown whereas your digicam continues to be.
6. Set Aperture
My rule of thumb is to set your aperture to the bottom f-stop quantity you may get to in your lens.
7. Shutter Pace
That is one to mess around with relying on what different mild sources are round you, together with moonlight. Longer exposures will end in brighter photographs, however stars will streak, and the aurora will soften. Brief exposures could have sharper particulars, however dimmer photographs require extra post-processing. Begin at 15 seconds and regulate. If you would like tremendous sharp stars, although, then it would be best to mess around together with your different settings (like ISO) to have a slower shutter – like 8 seconds.
8. Focal Size
Zoom out to the widest you’ll be able to in your lens – this ensures you’ll seize all of that lovely show within the sky.
You and your digicam at the moment are ready to seize the northern lights! Nonetheless, the final ingredient you want for aurora viewing is endurance. Northern lights are by no means assured, however you’ll be able to at all times select to ‘dance them out.’ Work in your finest hokie pokie and anticipate the northern lights to look and dance with you!
Associated